What you're building
Two files from one Airbnb or VRBO listing URL:
- A 16:9 walkthrough master (~90 seconds, 1080p) for the listing page itself — clean, text-free, structured like a real tour.
- A 9:16 social short (~45 seconds, 1080×1920) with elegant text overlays — one file you can post to Reels, YouTube Shorts, and TikTok as-is.
Here are both finished films from a real 5-bedroom Austin listing — watch them, then build your own:
Every frame starts from a photo the listing already has. Nothing is invented — the AI's job is camera movement, not set design. Typical time, doing it yourself: 30–45 minutes per listing, most of it unattended while the clips render — budget closer to an hour your first time. (Our done-for-you service quotes 2–3 hours because every order also gets human direction and a human review pass before it reaches you.)
This guide is written for three kinds of readers: property owners marketing their own places, Realtors who want a film on every listing they rep, and builders who see that a $497-a-pop service you can run in under an hour is a business. It's the exact workflow behind our done-for-you listing videos — if you'd rather buy the outcome, that's $497. If you'd rather own the method, keep reading. If you use Claude but have only ever chatted with it, you're exactly who this is written for — the one-time setup below turns that same conversation into a production pipeline, and from then on every video starts with pasting a URL.
What you need — at a glance
- A paid Claude plan with Claude Code — the AI that does all the work (claude.com/claude-code)
- A Higgsfield account with ~170+ credits — the video engine that animates the photos (higgsfield.ai)
- The Higgsfield connector added to Claude — one-time wiring, exact URL and screenshots below
- A listing URL — Airbnb, VRBO, or your own property page
- No editing software, no code skills — if you can chat with Claude, you're qualified; Claude installs its own helper tools
One-time setup — from chatting with Claude to producing with it
You already use Claude. This section adds the three pieces that turn it into your video crew — about 10 minutes, once. After that, every video starts at Step 1.
Prefer a checklist? Download the Quick-Start & Prompt Pack (PDF) — the setup steps, every copy-paste prompt from this guide, and the QC checklist in one printable doc.
1. Open Claude Code instead of the chat window
Claude Code comes with your paid Claude plan — grab the desktop app at claude.com/claude-code and sign in with the account you already have.
The one mental shift: it's the same conversation you're used to — you type, Claude answers — except this Claude can open files, run tools, and hand you finished deliverables. You still never write code or commands. You talk; it works; it asks before doing anything that needs your OK.
2. Create your Higgsfield account
higgsfield.ai — this is the video engine, home of Kling 3.0, the model that turns still photos into camera moves. Pick a plan with at least ~170 credits; that covers one full listing (about 20 clips).
3. Connect Higgsfield to Claude
Higgsfield connects as a custom connector — you paste its address into Claude once, and Claude can generate videos on your behalf from then on.
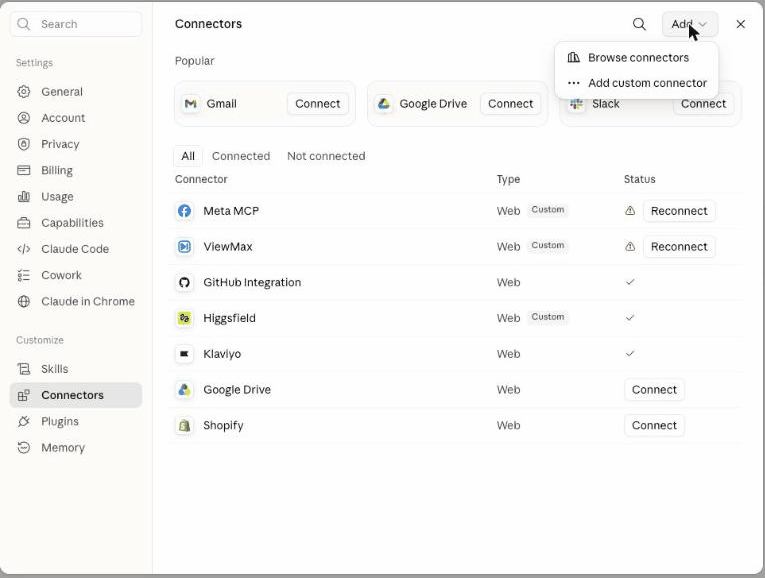
- In Claude, open Settings → Connectors. Click the Add button in the top-right, then Add custom connector:
- In the dialog, enter the name
Higgsfieldand this exact Remote MCP server URL (copy it):
https://mcp.higgsfield.ai/mcp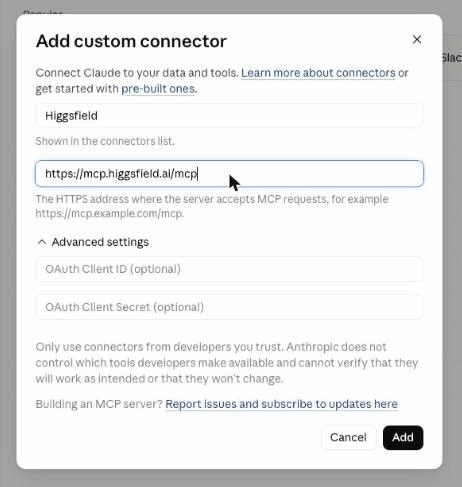
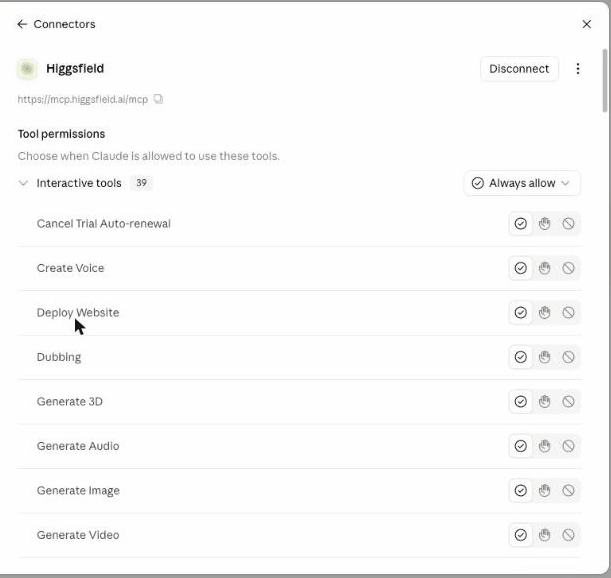
- Click Add, then sign in with the Higgsfield account from step 2 when it asks. When it's wired, opening Higgsfield in your connectors list looks like this — the URL at the top, its video tools listed below:
4. Teach Claude the workflow — once
So you never re-explain the method, save it as a skill. In Claude Code, say:
Save the following as a skill called "listing-videos" so we can
reuse it for any listing.
…and paste Steps 1–5 of this guide underneath. From then on, "make a walkthrough package for this listing: [URL]" is the entire job description — Claude already knows the rest.
5. Check the wiring
Type:
Check my Higgsfield credit balance.If Claude answers with your credit count, you're connected — setup is done for good.
What about video-editing software? There isn't any. Claude uses two free helper tools behind the scenes — ffmpeg for assembling video and Python for the text overlays — and it installs and runs them itself. If it needs one, it asks, you approve, it handles the rest.
Step 1 — Give Claude the listing URL
That's the entire step. Paste the Airbnb or VRBO link and say what you want:
Make a walkthrough video package for this listing: [URL].
I want the 16:9 walkthrough master and the 9:16 social short.
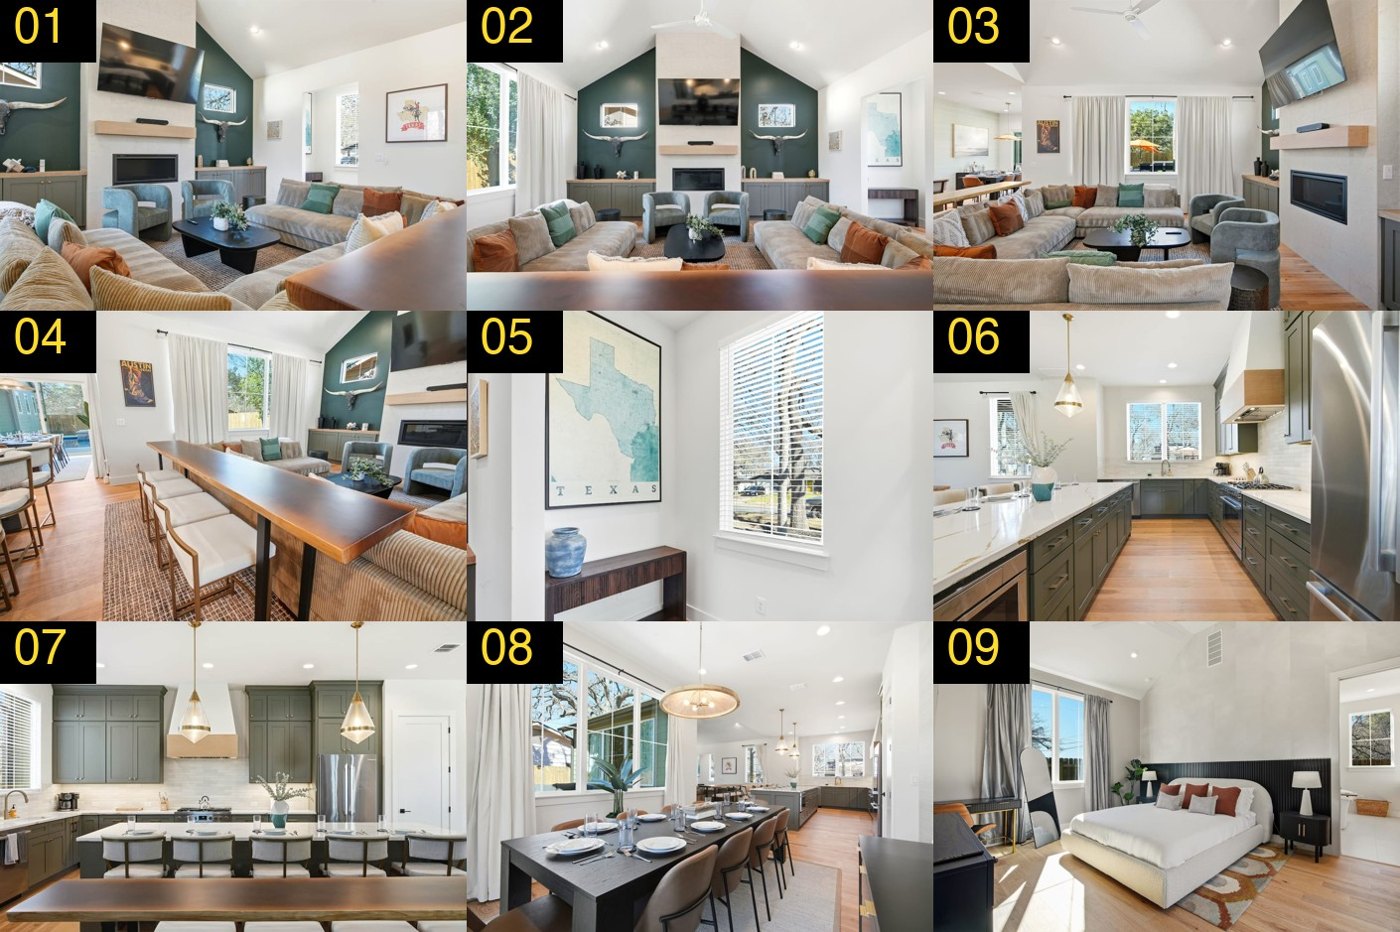
Claude extracts every photo, the room labels ("Living room image 2", "Backyard image 5"), and the property facts — bedrooms, baths, sleep count, rating, review count, amenities. In rare cases a site blocks automated reading; if that happens, save the listing photos to a folder yourself and point Claude at it. It rarely happens.
One rule to hold Claude to, and it's the most important one in this guide:
The facts rule: if the listing doesn't say it, your video doesn't say it. No "Guest Favourite" badge the listing doesn't hold, no "5.0" on a 4.98 listing, no "heated pool" unless those words appear. On our first build, a plausible-sounding badge nearly shipped before the fact-check caught it. Tell Claude: "Only use facts you verified from the listing."
Step 2 — Plan the shots: lead with the money shot
This video is a sales pitch, so tell Claude to sequence for engagement, not just geography:
Plan ~20 shots. This is a sales pitch — sequence for engagement:
rank every photo by visual impact first, and open with the single
most beautiful, enticing frame — the money shot, no exceptions. A
real aerial opens only if it IS the money shot (never fake one;
check the unlabeled extras at the end of the gallery). Spread the
strongest visuals across the whole cut — never two ordinary shots
back to back; plain-but-necessary rooms sit between hero shots.
Keep a tour feel where it doesn't fight the pacing, pair two-photo
rooms into travel shots, and close at twilight on the
second-strongest amenity.
What those directions buy you:
- The money shot opens, always. The first two seconds decide whether anyone keeps watching. A genuinely stunning aerial is a great opener — a mediocre one loses to a dusk pool or a showpiece kitchen, so rank by impact, not by shot type.
- Nothing gets left out — placement does the selling. Bedroom three still belongs in the video; it just never sits next to bedroom four. Sandwiching ordinary rooms between hero shots keeps momentum while covering the whole property.
- Travel shots are the biggest quality lever: two photos of the same room become one flowing camera move between real viewpoints, which reads as filmed, not animated.
- Amenities sell. Pool, hot tub, fire pit, game room — and closing at twilight on the second-strongest leaves the last impression almost as strong as the first.
Your best 8–9 shots become the social short — same rule there: strongest first.
Step 3 — Generate the shots
Claude writes a prompt for each photo and submits it to Higgsfield through the connector. The prompt contract that keeps the AI honest — every prompt Claude writes should pin these down:
Photorealistic, no people, no text.Preserve the [room's key objects] exactly as shown; only the camera moves.- The lighting as it exists in the photo ("pink dusk sky", "bright natural daylight").
- For signage or neon:
do not change any lettering, keep the wording exactly as it appears.
Small "alive" details are safe and sell the shot: fireplace flicker, pool ripples, flames in the fire pit. The proven templates — hand these to Claude:
Single-photo glide (5s):
Smooth flowing gimbal walkthrough gliding forward through the {room}
toward {focal point}. Continuous steady movement, no shake.
Photorealistic, no people, no text. Preserve the {key objects} exactly
as shown; only the camera moves. {Lighting as shot}. Premium real
estate interior.
Two-angle travel shot (6s — photo A is the start frame, photo B the end frame):
Smooth flowing {room} reveal. Camera glides past {contents of photo A},
then continues toward {contents of photo B}. Continuous flowing
movement, no cuts, no shake. Photorealistic, no people, no text.
Preserve all furniture and finishes exactly as shown; only the camera
moves. {Lighting}. Premium real estate interior.
Aerial opener (8s — only from a real aerial photo):
Aerial drone footage, golden hour. Smooth steady forward drone flight
over {scene} toward {landmark}. Slow, stable, high-altitude cinematic
drone move with gentle forward parallax. Photorealistic, no people, no
text. Preserve {sky and landscape} exactly as shown. Premium real
estate opening shot.
Two things to expect during generation:
- A ~20-shot listing renders in two waves of a few minutes each (batches of 12 run at once).
- Higgsfield sometimes interrupts a submission to recommend a stylistic preset (ours kept suggesting a moody "IN THE DARK" look). Tell Claude to decline it and resubmit — presets fight the bright, faithful look a listing needs.

Then QC with your own eyes. Ask Claude: "Show me a five-frame strip from every clip." Look for warped text, invented furniture, or "morphy" travel between angles. Anything off, have Claude regenerate it — at ~10 credits a clip, reshooting is cheap and shipping artifacts is not. (Morphy travel usually means the two photos didn't overlap enough; use a closer pair or a single-photo glide.)
Step 4 — Assemble both films
One more instruction:
Stitch the 20 clips into the 16:9 master at 1080p, 24fps, with
0.55-second crossfades and a fade in and out. Keep it text-free.
Then build the 9:16 social cut from the best 9 shots at 30fps:
blurred background fill, sharp center band, and text overlays using
only the facts you verified — a title card, one amenity label per
shot, and an end card with the real rating.
Claude runs the assembly with its helper tools. The design rules worth stating out loud:
- The master stays text-free — it has to look right inside the Airbnb player, and the platform's own UI supplies the context.
- The vertical is never a center-crop — the blurred-backdrop + sharp-band composite is what keeps compositions intact at 9:16.
- Overlay copy comes only from the verified facts. "5 BEDROOMS · 4 BATHS · SLEEPS 14" — nothing the listing doesn't say.
Step 5 — Ship it
- Post the vertical natively on each platform and add music there — platform-native audio gets better reach than baked-in tracks (that's also why the files are delivered silent).
- Keep the generated clips. Re-cuts, re-orders, and new formats cost zero new credits.
- Re-read every overlay against the listing one last time before anything goes live.
Moving fast — the one-prompt version
The steps above exist so you understand what good looks like and can direct Claude when something needs a judgment call. Once you've been through them, you don't need them one at a time — this single prompt runs the whole pipeline, pausing only for your QC approval:
Make a complete walkthrough video package for this listing: [PASTE URL]

Act as a senior real estate film director. The bar for everything
you produce: a clean, professional, premium listing film - bright
and inviting, calm flowing camera work, faithful to the property.
Every choice should look deliberate. No gimmicks, no artifacts,
nothing that reads as AI-generated. If a shot doesn't meet that
bar, reshoot it before showing me.

HARD RULE - never fabricate. Every frame shows only what the
listing's photos actually show. Do not invent, add, upgrade, or
"improve" rooms, furniture, views, finishes, or amenities - and
claim nothing the listing doesn't state. A guest books from this
video and then walks through the real front door: if the video
shows anything the property doesn't have, we have misrepresented
it. When in doubt, show less, never more.

Follow this exact workflow:

1. EXTRACT - Pull every photo with its room label, plus the verified
   facts: bedrooms, baths, sleeps, rating, review count, amenities.
   The facts rule: if the listing doesn't say it, our video doesn't.

2. PLAN ~20 shots. This is a sales pitch - sequence for engagement,
   not just geography:
   - Rank every photo by visual impact first. The single most
     beautiful, enticing frame is the MONEY SHOT and it opens the
     video, no exceptions. A real aerial opens only if it IS the
     money shot (never fake one; check the unlabeled extras at the
     end of the gallery for hidden aerials).
   - Spread the strongest visuals across the whole cut. Never place
     two ordinary shots back to back - every plain-but-necessary
     room sits between two hero shots so momentum never drops.
   - Keep a tour feel (arrive, live, rest, play, dusk) where it
     doesn't fight the pacing. Pair rooms with two overlapping
     photos into start-frame/end-frame travel shots. Close at
     twilight on the second-strongest amenity.

3. GENERATE each shot with Higgsfield (kling3_0, sound off): 5s
   glides, 6s travel shots, 8s aerials. Every prompt must include:
   "Photorealistic, no people, no text. Preserve the [room's key
   objects] exactly as shown; only the camera moves" plus the
   lighting as it exists in the photo. If Higgsfield recommends a
   style preset, decline it and resubmit.

4. QC - Show me a five-frame strip from every clip and wait for my
   approval. Regenerate anything I flag (warped text, invented
   objects, morphy travel).

5. ASSEMBLE after my approval:
   - 16:9 master: 1080p, 24fps, 0.55s crossfades, fade in/out,
     completely text-free
   - 9:16 social: best 9 shots, 30fps, blurred background fill,
     sharp center band, overlays from verified facts only (title
     card, one amenity label per shot, end card with the real
     rating), ~45 seconds

Deliver both files silent, named with the property name and format.
Swap in the URL, send it, and check back in half an hour. This is also exactly what to paste when you save the skill in setup — then every future video is just: "Use the listing-videos skill on [URL]."
The economics
A videographer walkthrough runs four figures and needs a shoot day scheduled around bookings. This workflow: ~170 credits and a typical run of 30–45 minutes — the clips render in parallel while you do something else, and your hands-on time is maybe ten of those minutes. No one enters the property, and once you've done it once, each new listing is a URL paste.
That's also why we can sell the done-for-you version at $497 with both formats included — the margin is in the method, and now you have it.
Advanced notes
For tinkerers only — none of this is needed for the workflow above:
- Higgsfield CLI / API. Everything the connector does is also scriptable: the
higgsfieldCLI (auth login,upload,generate create kling3_0 --prompt … --image,generate wait) and Higgsfield's API can drive generation from your own pipelines. - Exact assembly parameters, if you want to run ffmpeg yourself: normalize each clip (
scale=1920:1080:force_original_aspect_ratio=increase,crop=1920:1080,fps=24), chainxfade=transition=fade:duration=0.55(each offset = previous offset + clip duration − 0.55), encodelibx264 -crf 17 -pix_fmt yuv420p -movflags +faststart. The vertical composite: 1080×1920 blurred fill (gblur=sigma=42, brightness −0.16, saturation 0.75), 4:3 center crop scaled to 1080×810 overlaid at y=430, overlay PNG on top, 30fps, crf 19. - Swapping the video model. Two non-negotiables: image-to-video from a start frame (the photo is the first frame, not a style reference) and start + end frame support (that's what powers travel shots).
Stuck, or want to go further?
Grab the Quick-Start & Prompt Pack (PDF) so the prompts are always at hand. The fastest way to get unstuck — or to go deeper into the advanced methods — is the Brian with AI community: builders running these exact workflows, with Brian in the room. Or skip the learning curve entirely and have us make your video — $497, both formats, delivered in 2–3 hours.